

The Problem
In Metis we wanted to make the tools we are building accessible for developers, not only on the web, but also in the terminal, while keeping the developer experience on par with the web one. We started to develop a command line tool (CLI) using one of the many CLI packages available in node, argparse (a port of the builtin Python package). The tool became more and more complex over time: stateful, longer startup time, plethora of actions and so on. We also decided we wanted to provide a more interactive experience — like a REPL (read, eval, print, loop). Having all that in mind, we decided to build a new package on top of the node repl package.
Building our library on top of the builtin REPL package gave us multiple benefits. It allowed us to maintain a state for the whole execution of the application. It gave us an easier way to load everything that is required for the application from the very beginning. The REPL also has a simple completion system we could use to offer the user completions that would help them to know what to write and write it faster. Both CLI and REPL have a history that can be accessed with the arrow buttons. Unlike the CLI history, the REPL history is particular to our application, that means that when the user opens it, they can jump right back where they left the last time.
So, we hacked something up and it was working for a while, but soon enough things got more and more complex: we wanted to offer the user input validation, better completions, a CLI and REPL experience in the same tool, different output types for different consumers, a detailed help section, and etc. We realized we need to build a proper system on top of the node repl and argparse.
The Solution
The solution was writing our tool using a home-made package, called Terminus. The main features Terminus includes are:
- A simple way to define an action the user can take,
- A Plugin system that allows the core library to be extended,
- CLI and REPL in a single tool, with no extra work,
- Common building blocks for applications: state, configuration, progress, printing,
- Completions,
- Self documentation
Actions
At the core of the library are the actions. Each action is an object that contains all the information for an action the user can take, add a connection to a database, connect to the database, analyze a query and so on. The developer adds a description for the actions, they define what arguments the action takes, the arguments completions, what it does when it is called and how it renders the result and more. This descriptive approach replaced the reflection based solution we had in the past, a solution that was shaky at best. This approach allowed us to generate help, documentation, completions, validate the user input, and more.
An action can take user input in two ways: positional and options. The positional input is, as expected, arguments that are passed to the function in the REPL or the command in the CLI. The options are optional functions that the user can chain when calling the action function
or options passed to the CLI after the command name and the positional values
When the user types an action to call in the REPL, just like in the examples above, an object — ExecCommand — is created that has the user positional user input and a function called exec. When an action has options we add functions to that object, one for each option. Those functions return a new ExecCommand object with the previous data plus the new option value, which allows the user to chain them.
The ExecCommand also allows us to combine actions using with function:
It will facilitate building more operators and utilities in the future.
Plugins
As features are piled into Terminus or the application implemented using Terminus, it might start to feel a bit crowded. For this reason we implemented a Plugin system. A plugin can define a set of actions, configurations, setup and teardown function, and more. In this way an entire feature could be defined in a single location encapsulating all the moving parts of the feature. The plugin also allows us to build features in different packages. This allows us (and any external developers) to extend our tool, or any other tool built using Terminus.
CLI & REPL
As mentioned above, applications built with Terminus can be used in both CLI and REPL modes. Each action can target one or more modes, currently those modes are CLI and REPL.That means that the user can use the same application just like any other CLI, calling one or more actions by name with input values, or start the tool as a REPL and then run the actions.
Builtin Components
One thing we noticed was that there are several things that might be useful for any tool that we want to integrate into the core package: state management, user configuration, a progress indicator, auto-generated documentation, etc. All those components are available to each action, and this system can be extended to include custom components. The less imports the actions uses, the easier it is to write tests for it, as the components can be mocked and injected into the action.
Completions
It’s hard to remember, and to type, the action name and its input. To make lifes a bit easier we implemented completion systems for the REPL, on top of the builtin REPL completions, and one for the CLI, for bash and zsh. The action name completions do not require any work from the developer. Positional and options require developer implementation. Each action can define a function that will return a list that will be used as completion options for the user for the positional input. An option can define its own completion function. In REPL mode the user input is parsed using acorn-loose and the returned abstract syntax tree (AST) is used to determine which completion to offer.
The CLI completions work differently. Writing dynamic completions for bash, in bash, is not an easy task. Furthermore, from bash it would be much harder to reuse the completion setup we have for the REPL. The solution was calling a special action from bash that takes the current user input, parses it, and offers completions based on that. The downside is that for each completion the whole application must be loaded, depending on the application, it might be a bit slow (there’s a flag indicating that we are in completion mode that can be used to skip unnecessary steps in your startup setup).

Help & Documentation
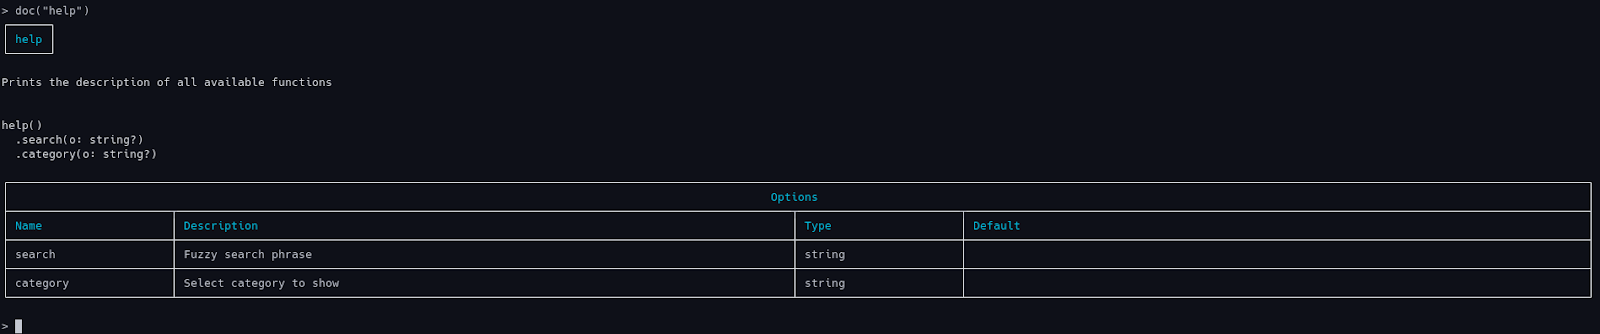
If the user still can’t remember, or doesn’t know what they are looking for, they could always use the help action to get the full list of available commands. A more detailed page for each command is accessible with the doc action that takes an action name. The user can also get a full README format documentation for all the actions with examples using generate-docs action, an action that takes a file path that serves as an output file. You can also trigger the documentation for each action in REPL mode by calling the help function on the action:
Conclusion
We set out to create a system that will allow us to provide our users with a great terminal experience, interactive or otherwise, and ended up with a general-use tool that could be useful for others as well. We hope that the abstractions we made would allow us, and other devs, to keep extending the system, the core library or as an external plugin, so it could provide even more useful features. We released Terminus as an open-source library that you can use in accordance with the MIT license.
We would keep adjusting the API and abstractions, hopefully with the help of the public, till we feel it is good enough to be called 1.0. Till then expect breaking changes. The next features we want to work on are: an abstraction for rendering that will allow us to change how we present the data to the user in a single change; typescript (CommonJS and ESM support); and improving the Terminus’ API based on the developer feedback we hope to get. Terminus can mean “end of the road”. We hope that for us this is just the start.


